
Writen by Birgit
You are not allowed to forward this
lesson or to place it on any web site.
This lesson is © Birgit - www.birgitja net - 2009
It's my own idea, any resemblance to another tutorial is purely coincidental.
But all graphics made by your self are yours.
I used Psp 9 , but other versions should work.
I have used 1 tube and 1 Brush both my own.
Font Chicken Basket. All here in zip.
Plugins Texturizer, here
Save plugins in your plugins folder, befor you open Psp .
Put Brush in Psp's brush folder, and open tube in Psp.
Text open in Psp and minimer.
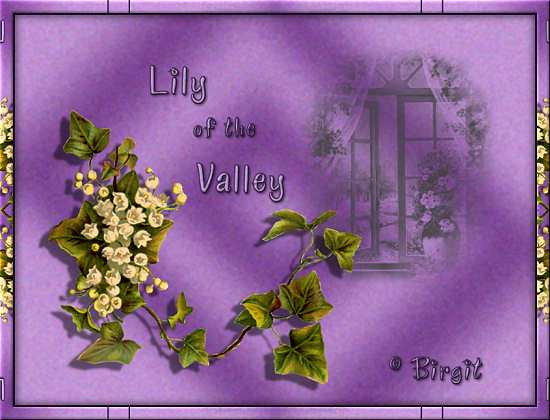
1.
We begin with an Image 800 x 600 transparent.
Sett foreground to #763f8d and background to #af86c0.
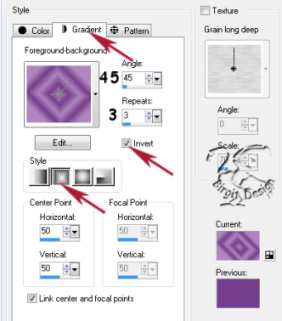
Make Gradient - Foreground/Background - Angle 45, Repeat 5,
Invert checked, and rectangular:
Fill. Go to Adjust/Blur/Gaussian Blur and sett radius 20.
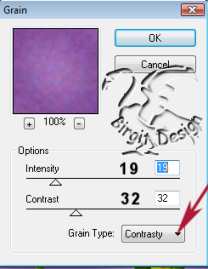
Now Effets/Plugins/Texture/Grain. Intensity 19,
Contrast 32, Grain Type- Contrasty.
2.
New Layer. Sett foregroundTo #404040. Go to Paint Brush
Find bj-vindu brush, size 445.

Place brush up left as in my tag.
3.
Open bj-konval. Edit Copi, close . Now on Image Paste
as a New layer.
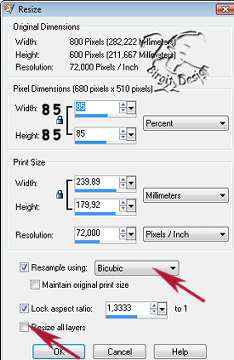
Resize 2 x 85 % , all layers unchecked:
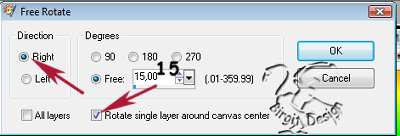
Image/rotate/Free Rotate:
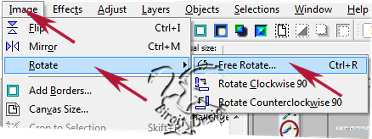
Right 15 , rotate single layer.
Use mower tool and place it as my tag.
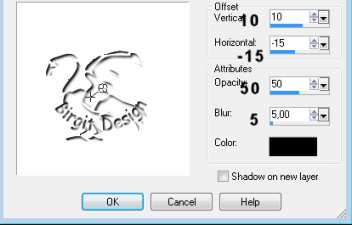
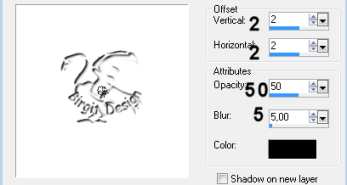
Now Effects/3Deffect/Drop Shadow:
4.
Now we are going to write some text.
Sett foreground to #3d254a and background to b195c3.
Go to texttool and set Create as to Vector, Font Chicken Basket, size 48,
Stroke 2 . Write -Lily. Then sett size to 32 and write - of the below Lily.
Now sett size to 48 and write -Valley below.

Right click layer and Convert to Raster layer.
Now go to Effects/3Deffect/Innerbevel:
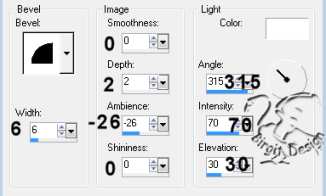
And then Effects/3Deffect/Drop Shadow:
Place your name using same font, bevel and shadow.
I use size 36.
Merge all flatten. Edit Copi.
5.
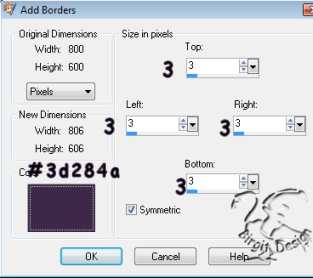
Now we will add some borders. Then go to Image/Add Borders,
and sett symetric 3 pixel, color your foreground #3d284a. OK
Now borders 20 pixel color White. Use Magic Wand on
borders to selecter.:

On topp of Image, right click and Paste/Paste into selection.
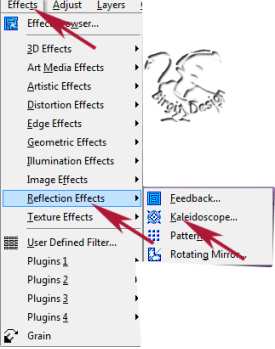
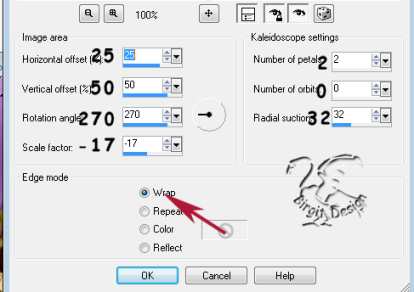
Not deselect. Go to Effects/Reflection/Kaleidoscope:
with this settings:
don't deselect. Go to Effects/3Deffect/Innerbevel as befor.
Deselect.
Selection/Select All , Selection/Modify/Contract:
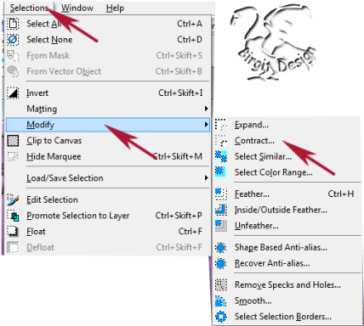
sett to 20. Selection/Float. Effects/3D effect/Cut Out:
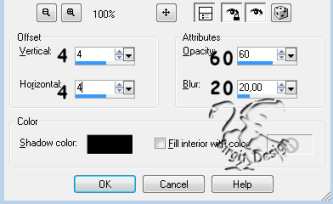
Repeat but sett vert., horiz. -4.
Deselect.
Resize width to 550 pixel, all layers checked. Smart Size
Adjust/Sharpness/sharpen.
Now we are ready. Hope you like this tag.
You are welcome to mail me

Tutorialer ~ ~ ~ ~
Scrap tutorialer
~ ~ ~ ~ Tag tutorialer
Home